
by: Kimberly Roberto and Dr. Janet Early
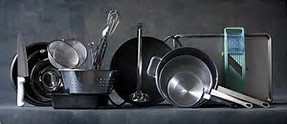
Creating nutritious, delicious meals and snacks using food created by God is the most important thing you can do for your family, and the place to do that is in the kitchen! Whether you are just getting introduced or re-introduced to your kitchen, or are a seasoned veteran in the kitchen, you will find the following lists of basics and specialty items of tools helpful.
Basics for every kitchen:
| Knives (invest in a good set) | Pepper grinder | Spatulas and tongs |
| Vegetable peeler | Measuring cups and spoons | Salad Spinner |
| Mixing Bowls | Citrus juicer or reamer | Colander/strainer |
| Garlic press | Cutting Boards |
Small appliances:
Food Processor – Efficient way to chop and puree vegetables to create quick salads, spreads, dips, soups, and snacks. This is especially great for making hummus and mixing the ingredients for the Almond Power bars in the nutrition book.
Blender – good for smoothies and soups. Some high-end blenders, such as the Vita-Mix double as a food processor. Another great trick is to do a wet chop. Simply put roughly chopped veggies like onions and celery in the Vita-Mix and cover with filtered water. Turn the speed up to desired size. 3-4 will be a medium chop, 5-6 will be a very fine chop/dice. Strain the water off and you will have perfectly uniform chopped veggies in seconds. (Great when cooking for a crowd)
Hand-Held Blender – Use for single-serving smoothies, which is especially helpful while traveling. Also make quick, delicious soups by simmering your favorite vegetables in broth until the vegetables are soft, and then pureeing by putting the hand-held blender directly into the pot and blending right there. This tool also comes in handy when blending black beans directly in a mixing bowl to make ML’s Advanced Plan black-bean cake! Prices range from $13 – $50. All work similarly but if you end up using this tool a lot the cheaper one will have to be replaced sooner.
Crock Pot – cooks food slowly. Place all your ingredients in the crock pot in the morning and come home to a hot meal. You can make meals large enough to have plenty of left-overs. Crock pots are terrific for slow-cooking roasts and whole chickens.
Indoor Grill – when it’s not barbecue season, use a cast-iron grill for the safest and least toxic form of indoor grilling.
Steamer – the healthiest way to cook your vegetables. Gently steam them in either an electric steamer or a steamer basket over a pan.
Food Dehydrator – if set on 150° F or less, the food retains its raw, live qualities. This is great for dehydrating sliced fruit (like apple chips), drying fresh herbs, kale chips, homemade grass-fed beef jerky (this is so much more affordable than store bought).
Cookware (Including grill pans and a heavy bottomed soup pot) – the safest and least toxic forms of cookware are cast iron and enameled cast iron, followed by stainless steel, Thermolon™, and glass. Newer brands of non-stick ceramic cookware are not only non-toxic but easy to use in place of traditional non-stick cookware (Teflon® is facing class-action lawsuits and possible extinction within the next decade due to toxicity hazards).
Parchment Paper – this is your friend when baking advanced plan crusts, cakes, and cookies. You can line a baking sheet, square or rectangular baking dishes, and to buffer food from plastics when freezing. Another great trick when making the advanced plan pizza crust is to put a damp paper towel on the counter then the parchment paper. The paper towel will keep it from sliding around on you. (A Silpat is another great non-stick option to line a baking sheet)
As your mastery and creativity expands, you may find some of these tools useful as well:
Vegetable spiral slicer – transform zucchini into pasta instantly. Without the skins, you won’t be able to tell the difference. Cook in any sauce and you’ve effectively replaced traditional carbohydrates with healthy vegetables. The spiral slicer is also ideal for creative salad toppings, such as carrots and onions.
Egg Slicer/Dicer – great for Egg Salad or salads and garnishes.
Citrus juicer or reamer – Nothing tastes as good in your recipes that call for lemon or lime juice then the real thing! Tip: When you have to get out your citrus juicer for a recipe, juice some extra and freeze the rest for the next time you need it. Lemon and lime juice both freeze nicely.
One-quart mason jars and lids for storing and soaking ingredients.
Fine Mesh strainer
Sprout bag – makes growing sprouts a cinch.
Microplane – great for whole nutmeg, ginger, and citrus peels, etc.
Mandoline – Makes uniform slices of tomatoes, onions, zucchini and other vegetables as well as beautiful julienne slices with little effort.
Digital Kitchen Scale – Traditionally used for portion control, but an even better use is weighing ingredients that are messy to measure directly into you mixing bowl, food processor bowl, or sauce pan with use of the “tare” button. You will be able to make easy conversions by looking at the nutrition labels of your ingredients because serving sizes will also be listed in grams. See recipe for Maximized Living’s Almond Power Bars with ingredient amounts listed in grams below.
Funnels – This is an inexpensive item (less than $5) that can make transfer of foods into jars for storage much easier. A wide-mouthed one is great for pouring soup or sauces into Mason jars. If you want to go all-out, try KitchenAid Pro’s set of 3 funnels for $17.49 from Amazon. You’ll get 3 different sizes, including a wide-mouth size and a removable strainer that fits all 3 sizes.
Roaster Pan
Mortar/pestle – blending spices is one of the best ways to ensure a constant variety of flavors in the kitchen.
Juicer – If you find yourself doing more juicing than your blender can handle, and actual vegetable-and-fruit juicer is an incredible tool to create delicious drinks to nourish the whole family.
If you would like to try your hand at using the digital scale…try this converted recipe…
Almond Power Bars using digital scale with grams as unit of measure:
Ingredients for saucepan:
104 grams Coconut Oil
14 grams Pure Vanilla Extract.
Measure the coconut oil and vanilla extract directly into a sauce pan using this method: Put the saucepan and a large spoon on the digital scale and press “tare” to zero out. Use the spoon to remove coconut oil from its jar, and put the oil and spoon directly into the pot and check the weight on the scale. Add or subtract coconut oil from your spoon until you have exactly 104 grams. Zero out the scale again and add the required amount of vanilla extract.
Melt the coconut oil with vanilla gently on low heat for 1 – 2 minutes until the coconut oil is liquid. Do not overheat and cause the coconut oil to smoke. Set the oil mixture aside to be added to the food processor after processing the other ingredients.
Ingredients for food processor bowl:
206 grams Raw Almonds or Almond Flour
60 grams Flaxseed Meal
46 grams Unsweetened Shredded Coconut
60 grams (or two scoops) Flavored Whey Protein Powder
120 grams Raw Almond Butter
Scant 3 grams Sea Salt
¾ Teaspoon Stevia Powder, to taste
Turn your digital scale on, and adjust to measure in grams. Put your food processor bowl on its base and add the chopper. Carefully remove bowl and put finger in bottom side of bowl and chopper to secure the chopper in place. Carefully remove finger as you place the bowl on a digital kitchen scale. Press the “tare” button on the digital scale to reset the weight to zero. Add ingredients one at a time using the grams to measure. After each addition, press “tare” again to zero the scale. When all ingredients have been added, carefully lift the processor bowl, re-insert your finger into the bottom of the bowl and chopper to keep the chopper in place while you return the bowl to its base and lock in position. Turn the processor on until ingredients are mostly mixed. Add the coconut oil and vanilla and pulse until the ingredients have formed a course paste. Press mixture into an 8 x 8 glass baking dish, lined with parchment paper and coconut oil. Chill in refrigerator for 1 hour, or until mixture hardens. Cut into bars and enjoy as is, or add a chocolate coating, following the instructions on page. 108 in the Maximized Living Nutrition Plan book.

Published by